Monday, December 12, 2011

How to get HyperLinkField value in GridView

How can we get HyperLinkField text value from GridView control when the field is data-bound? BoundField data can be retrieved by simply using .Text property. But unlike BoundField, HyperLinkField.Text property does not return the same text value as shown in GridView.
In the following example, GridView has three columns - one for HyperLinkField, 2nd one for BoundField, and the last one for Delete CommandField. Let us say we want to get first column value as a key, when user clicks Delete button in 3rd column.
<asp:GridView ID="grid1" runat="server" onrowdeleting="grid1_RowDeleting">
    <columns>
        <asp:HyperLinkField DataNavigateUrlFields="Link" 
            DataNavigateUrlFormatString="~\{0}" DataTextField="Link"
            HeaderText="Link ID" Target="_blank" />
        <asp:BoundField DataField="Name" HeaderText="Name">
           <itemstyle Width="200px" />
        </asp:BoundField>
        <asp:CommandField ShowDeleteButton="True" />
    </Columns>
</asp:GridView>

So when user clicks Delete button, OnRowDeleting event handler will be fired.
In the event handler, RowIndex will be passed from a GridViewDeleteEventArgs argument. Thus current GridViewRow can be retrieved from Rows[e.RowIndex].

protected void grid1_RowDeleting(object sender, GridViewDeleteEventArgs e)
{
    GridViewRow row = grid1.Rows[e.RowIndex];
    // Gets HyperlinkField data
    string linkID = ((HyperLink)row.Cells[0].Controls[0]).Text;    
    // Gets BoundField data 
    string name = row.Cells[1].Text;    

    DeleteRow(linkID);
    ReloadGridData();
}

Since we want to check first column, row.Cells[0] returns first column of the row as a TableCell object. First child control in the TableCell object is a HyperLink object, so we cast it as HyperLink and gets the Text property of the HyperLink object.

Saturday, November 12, 2011

Javascript Popup Window

There are some cases we need to launch new popup window when user click a link or button. For example, when we want to show some privacy detail information when user clicks Privacy link. Typically this is done by Javascript and normally the popup window does not have toolbar, menu, scollbar and status bar.

So here is popup window inline javascript. It pops up a new window whose size is 470 x 150. return false statement is added at the end so that it keeps current window as well.

<a href="/Privacy.htm"
    onclick="javascript: window.open('/Privacy.htm','_blank',
          'resizable=no,toolbar=no,scrollbars=no,menubar=no,status=no,directories=no,
           width=470,height=150', false); return false;">Privacy</a>

Of course, the Javascript can be placed to <Script> section in HEAD and simply calls the Javascript function in OnClick event.

Wednesday, November 9, 2011

GoDaddy email error : 553 sorry, your mail was administratively denied

In the previous post I explained about sending SMTP mail from ASP.NET. When I use it in Arvixe web hosting, it went well. But, I happened to try GoDaddy web hosting with the same source code. Then now I got the the following exception : 553 sorry, your mail was administratively denied. There have been some complaint about this problem. With some struggle, I ended up with the following workaround.

(1) GoDaddy SMTP server settings in web.config are as follows. Please note that you do not need username and password information here.

<system.net>
   <mailSettings>
     <smtp>
       <network host="relay-hosting.secureserver.net" port="25" />
      </smtp>
</mailSettings>
</system.net>
(2) I used Contact Form in ASP.NET and took FROM email address from textbox, which most people do. The thing is GoDaddy mail system denied this kind of email address.

string from = txtEmail.Text.Trim();               
string subject = txtSubject.Text.Trim();               
string body = txtMsg.Text;
string to = WebConfigurationManager.AppSettings["MailAccount"];
body = string.Format("From: {0}{1}{2}", from, Environment.NewLine, body);               
from = to;  // Do not use user's email address
MailMessage message = new MailMessage(from, to, subject, body);
SmtpClient smtp = new SmtpClient();
smtp.Send(message);

So the workaround is to use my domain email account in FROM part and put the customer's email to subject or body part. I don't like it but it worked anyway...

Saturday, September 24, 2011

SEO Friendly URL using URL Routing in ASP.NET

Many SEO (Search Engine Optimization) professionals say that dirty URLs are not appealing to web search engines. ASP.NET web pages are basically dynamic web pages and so tend to be dirty URLs. It is common that ASP.NET .aspx page has some parameters in its URL. For example, a sample of dirty URL is like http://x.com/shop.aspx?Category=Car&Maker=Ford. Search engines tend to have difficult time to figure query string parameters. SEO friendly URL is a.k.a clean URL which has folder-like structure. The dirty URL above can be rewritten to http://x.com/shop/car/ford. And from userability point of view, it's much easier to remember as well.

By and large, there are two ways of making website more SEO friendly. One is URL Rewriting and the other is URL Routing.

URL Rewriting
When a client issues a URL to Web server, the URL-rewriting ISAPI DLL analyzes the requested URL and changes it to other URL before it sends the request to web page. Most IIS servers (v5, v6, v7) supports it.

URL Routing
ASP.NET URL routing does not actually change incoming URL and dispatches a URL request to a specific handler based on the requested URL path. Works on latest ASP.NET version (3.5, 4.0).

So assuming we're using ASP.NET 4.0, let's take a look at how to make ASP.NET webpage more SEO friendly by using URL routing scheme.

1) Define URL Routing tables in Global.asax. In Global.asax;
void Application_Start(object sender, EventArgs e)
{
    this.RegisterRoutes(RouteTable.Routes);
}

void RegisterRoutes(RouteCollection routes)
{            
    //If you use ASP.NET AJAX
    routes.Ignore("{resource}.axd/{*pathInfo}");

    // Define Routing Tables
    routes.MapPageRoute("item", "shop/{item}", "~/shop.aspx");
}

If you use ASP.NET AJAX, you might get an error:
'ASP.NET Ajax client-side framework failed to load.'
This can be avoided by adding routes.Ignore statement above.

MapPageRoute() method has many overrodes but here first parameter is route map name; you need to put any unique mapping name. 2nd parameter is URL input routing pattern. With this pattern, the incoming URL is like http://x.com/shop/iPhone. In this case, the string 'iPhone' corresponds to {item}. 3rd parameter is physical file that will process the URL. So shop.aspx will take parameter {item} (which is iPhone) and process the incoming URL request.

2) Process URL request in designated .ASPX page.
In Page_Load() method of shop.aspx.cs file, {item} data can be retrieved by looking up Page.RouteData.Values collection.
protected void Page_Load(object sender, EventArgs e)
{
  string item = Page.RouteData.Values["item"] as string;                
  if (!string.IsNullOrEmpty(item))
  {   
      // set item data here
      return;
    }
  }
  Response.Redirect("/Default.aspx");
}

So URL routing is quite simple, but it's powerful in terms of SEO.
One thing worthy adding is that Routing tables are looked up sequentially, so one can add special routing case before generic routing pattern.

Wednesday, September 21, 2011

Send email in ASP.NET ( from Arvixe web hosting )

This post explains about how to send email in ASP.NET. Sending mail from ASP.NET is not complex, per se. But, it might take a while to figure out since we normally don't set it up often. If you're using Web Hosting, typically web hosting company already set up the mail server, so all you need is to create mail account and use it. I am using Arvixe ASP.NET web hosting so I will show you how to send email by using Arvixe SMTP mail server.

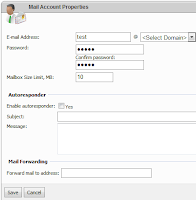
1) First, you have to create mail account in Arvixe Control Panel (or your web hosting control panel)
Log in to Control Panel and select Mail -> Accounts and create new email account.


2) Once SMTP email account is created, you can send email in ASP.NET with the following code. Let's say your domain is TEST.COM; in that case your mail server will be mail.test.com in Arvixe.

MailMessage msg = new MailMessage();
msg.From = new MailAddress("admin@test.com");
msg.To.Add(new MailAddress("tom@gmail.com"));
msg.Subject = "Meeting";
msg.Body ="Body message";            

SmtpClient smtp = new SmtpClient("mail.test.com", 25);
smtp.Credentials = new NetworkCredential("admin@test.com", "admin1234");            
smtp.Send(msg);

 In your ASP code-behind or any business class, you create MailMessage which includes From/To/Subject and Body message and send it to SMTP mail server through SMTP port 25.

You have to specify your mail server (mail.test.com) in SmtpClient constructor and since your SMTP server requires authentication, you also have to provide Credential. You can use your mail account information in credential username (admin@test.com in this example) and its password. If SMTP server requires credential but you don't specify username and password, the following exception will occur.

The SMTP server requires a secure connection or the client was not authenticated. The server response was: SMTP authentication is required.

3) The above code snippet will work but server name and user/password info are hardcoded. Not a good way. In ASP.NET, we can move those information to web.config as follows.

<system.net>
<mailSettings>
<smtp>
<network host="mail.test.com" port="25" userName="admin@test.com" password="admin1234" />
</smtp>
</mailSettings>
</system.net>

And then C# code can be simplified like this.

private void SendSmtpMail(MailMessage message)
{
  SmtpClient smtp = new SmtpClient();
  smtp.Send(message);
}

As you can see, you do not specify mail server name and port number. And credential information can come from web.config file.

4) Now, you can check your email. In our example, you are supposed to check your email from http://mail.test.com (in Arvixe case), assuming the domain is test.com.

Tuesday, September 20, 2011

How to pass parameters to ASP.NET user control

One common way of passing parameters to ASP.NET user control is to use public properties in user control. As always, let's take a look at a simple example here. The following user control displays main title with a specific style.

MainTitle.ascx
<%@ Control Language="C#" AutoEventWireup="true" CodeBehind="MainTitle.ascx.cs" Inherits="MyWeb.Modules.MainTitle" %>
   
<div class="main-title">
  <asp:Label ID="lblTitle" runat="server" Text="Main" />
</div>
<br />

In .aspx page that includes this user control, one might want to change title text of this control. To pass title parameter, one public property called Title is added to user control code-behind file as follows.

MainTitle.ascx.cs
namespace MyWeb.Modules
{
   public partial class MainTitle : System.Web.UI.UserControl
   {
      protected void Page_Load(object sender, EventArgs e)
      {
          if (!string.IsNullOrEmpty(Title))
          {
              lblTitle.Text = Title;
          }          
      }

      public string Title { get; set; }
   }
}

Now, ASP.NET page containing the user control can pass parameter by setting any value to the public property of the ascx control. First, test.aspx file below registers the user control and add MainTitle user control to the web page.

Test.aspx
<%@ Page Language="C#" MasterPageFile="~/Masters/DefaultLayout.master" AutoEventWireup="true"
    CodeBehind="Test.aspx.cs" Inherits="Test.Article" %>
<%@ Register TagPrefix="myControl" TagName="MainTitle" Src="~/Modules/MainTitle.ascx" %>

<asp:Content ID="BodyContent" runat="server" ContentPlaceHolderID="Main">
    <myControl:MainTitle runat="server" ID="mainTitle" />       
</asp:Content>

Then in the code-behind, Title property of the mainTitle object can be set as follows.

Test.aspx.cs
public partial class Test: System.Web.UI.Page
{
  protected void Page_Load(object sender, EventArgs e)
  {
    if (!this.IsPostBack)
    {                                
       mainTitle.Title = "New Title"; //set property              
    }
  }
}

Friday, September 9, 2011

Convert byte array to image in ASP.NET

There are several cases you want to convert byte array to image. For example, if you have image data in your database, your image will be byte array. Another example is you might to want to draw picture on th fly in your memory and send the image to web browser. This article shows how to convert the binary data to actual image in ASP.NET.

1) First, create a new ASP.NET webpage(.aspx) and remove all content except first line as follows. We will send image directly from code-behind code.

<%@ Page Language="C#" AutoEventWireup="true" CodeBehind="WebForm1.aspx.cs" Inherits="TestWeb1.WebForm1" %>

2) In code-behind page, call CreateImage method in Page_Load. This means when the aspx page is loaded, the image will be sent to web browser.

using System;
using System.Drawing;
using System.IO;

namespace TestWeb1
{
   public partial class WebForm1 : System.Web.UI.Page
   {
      protected void Page_Load(object sender, EventArgs e)
      {
         this.CreateImage();
      }

      protected void CreateImage()
      {
         int width = 100;
         int height = 100;
         Bitmap image = new Bitmap(width, height);
         Graphics g = Graphics.FromImage(image);

         try
         {
            // Draw something
            for (int i = 0; i < height/2; i+=4)
            {
               g.DrawRectangle(new Pen(Color.Red), i, i, image.Width - 1, image.Height - 1);
            }

            // Save it to memory in image format
            MemoryStream mem = new MemoryStream();
            image.Save(mem, System.Drawing.Imaging.ImageFormat.Gif);

            // Send byte array
            Response.ClearContent();
            Response.ContentType = "image/gif";
            Response.BinaryWrite(mem.ToArray());
            Response.End();
         }
         finally
         {
            g.Dispose();
            image.Dispose();
         }
      }
   }
}
In CreateImage() method, you create empty Bitmap image (100x100 in this example) and draw some rectangles by using graphics object. Once drawing is done, save the bitmap image to memory with specific image format. The example above (image.Save() method) shows that bitmap image is saved into memory in GIF format. Once formatted image is in memory, you can convert it to byte array. To send data to web browser, clear all content in Response object and set ContentType to specific image type (image/gif in this case). Then The byte array is sent to web browser by using Response.BinaryWrite(). When everything is done, call Response.End() and finish the work.

3) In your another web page, set <img> src attribe to the webpage created in step (1).

<img src="WebForm1.aspx" />
Since image is an independent web object, imageloading can be done separately by this way.

Monday, August 29, 2011

How to localize a website - ASP.NET

There are many different ways of doing localization for the website. This post explains one simple way of localization for the ASP.NET website. By and large, there are 3 steps of doing it...

Step 1. Create ASP.NET resource file

The first step is to create ASP.NET resource file (.resx). There are two types of ASP.NET resource file - Global Resource and Local Resource. Global resource file can be shared by all ASP.NET pages and local resource file only applies to one ASP.NET page. In this post, let's use Global resource file for simplicity. To add resource file, create a special ASP.NET folder called App_GlobalResources and add resource files under the folder.
  1.  (VS 2010) In ASP.NET web project, rightclick and select Add -> Add ASP.NET Folder -> App_GlobalResources. 
  2.  Under App_GlobalResources, add New Item (ex: WebResource1.resx file). This is English (or neutral) resource file.
  3. Under App_GlobalResources, add another New Item whose filename has locale characters such as ko,jp,es, etc. (ex: WebResource1.ko.resx file).
  4. Add the same resource [Name]s to the resource files and just localize resource [Value].

Step 2. Use Resource String in ASPX
Once resource strings are stored in .resx file, simply build the project and then VS will automatically generate strongly type resource class, just like WinForm .resx file. Now, you can use resource string in your .aspx file or .aspx.cs code behnid file.

<div>
<asp:label runat="server" text="<%$ Resources:WebResource1,Title %>">
</asp:label>
</div>

The example above shows that resource class is WebResource1 and resource name is Title. One thing to note is that you have to put the resource expression in ASP.NET server control such as asp:Label or asp:Literal, not in HTML tag. For example, you will get an error if you put resource expression in SPAN html tag.

In code behind, you can set the same way of .NET resource.

   using Resources;
   .....
   labelTitle.Text = WebResource1.Title;

Step 3. Set Page to use resource string based on Culture

Now, the last step is to set locale to the web page, so that the page reads the resource string from the specific language. You can set the entire web site to use specific culture by using web.config or set each page by using @page directive or programmatically. Here is an example of doing it in the code - overrides InitializeCulture() method and set 4 Culture properties as follows.

protected override void InitializeCulture()
{
  if (Session["lang"] != null)
  {
    lang = Session["lang"].ToString();
    Page.Culture = lang;
    Page.UICulture = lang;
    Thread.CurrentThread.CurrentCulture = CultureInfo.CreateSpecificCulture(lang);
    Thread.CurrentThread.CurrentUICulture = CultureInfo.CreateSpecificCulture(lang);
  }
  base.InitializeCulture();
}

If you use Session to store language information, each user can use different language for the same web page. Even if this is not required to implment localization, I found it useful sometimes.

Sunday, August 28, 2011

WCF - how to fix maxStringContentLength 8192 limit

If you use WCF service from Web application or desktop application, you might have the following error if you send/receive big data.

The maximum string content length quota (8192) has been exceeded while reading XML data.

This error occurs since WCF by default sets 8K limit to prevent DoS attack. However, there are many business needs to increase this limit. And it can be adjusted by change some values in .config file (web.config for ASP.NET/WCF or app.config for Windows application).  There are many sites that talked about this topic. For example, you can refer to this discussion (The maximum string content length quota (8192) has been exceeded). I just decided to summarize this topic (well, primarily for myself) since those sites didn't work for me somehow, at least for my case.

Here is a simple example of increasing the 8K limit. Basically both WCF side web.config and client side web.config (let's assume ASP.NET, but the same applies to app.config) should be changed accordingly.

(1) Server side (WCF web.config)

In web.config for WCF, you need to increase maxBufferSize, maxReceivedMessageSize, maxStringContentLength. Below example increased the value to 2GB, but it purely depends on business need.

<configuration>
  <system.web>
    <compilation debug="true" targetFramework="4.0" />
  </system.web>
 
  <system.serviceModel>

    <services>
      <service name="MyWcfService.MyService">
        <endpoint address="" binding="basicHttpBinding" bindingConfiguration="basicHttpConfiguration" contract="MyWcfService.IMyService">
        </endpoint>       
      </service> 
    </services>
   
    <bindings>     
      <basicHttpBinding>
        <binding name="basicHttpConfiguration" maxBufferSize="2147483647" maxReceivedMessageSize="2147483647">
          <readerQuotas maxStringContentLength="2147483647" />
        </binding>
      </basicHttpBinding>
    </bindings>   
   
    <behaviors>
      <serviceBehaviors>
        <behavior>
          <serviceMetadata httpGetEnabled="false"/>
          <serviceDebug includeExceptionDetailInFaults="false"/>
        </behavior>
      </serviceBehaviors>
    </behaviors>   
    <serviceHostingEnvironment multipleSiteBindingsEnabled="true" />
  </system.serviceModel> 
 
 <system.webServer>
    <modules runAllManagedModulesForAllRequests="true"/>
  </system.webServer> 
</configuration>


2) Client side (ASP.NET web.config)

In client side web.config, you need to increase maxBufferSize, maxBufferPoolSize, maxReceivedMessageSize, maxStringContentLength.


<system.serviceModel>
   <bindings>
      <basicHttpBinding>
        <binding name="BasicHttpBinding_ICipherService" closeTimeout="00:01:00"
           openTimeout="00:01:00" receiveTimeout="00:10:00" sendTimeout="00:01:00"
           allowCookies="false" bypassProxyOnLocal="false"
           hostNameComparisonMode="StrongWildcard"
           maxBufferSize="2147483647" maxBufferPoolSize="2147483647"
           maxReceivedMessageSize="2147483647"           messageEncoding="Text" textEncoding="utf-8" transferMode="Buffered"
           useDefaultWebProxy="true">
           <readerQuotas maxDepth="32" maxStringContentLength="2147483647"
                  maxArrayLength="16384" maxBytesPerRead="4096"
                  maxNameTableCharCount="16384" />
           <security mode="None">
              <transport clientCredentialType="None" proxyCredentialType="None"
                           realm="" />
               <message clientCredentialType="UserName" algorithmSuite="Default" />
           </security>
         </binding>
     </basicHttpBinding>
  </bindings>
    
  <client>
     <endpoint address="http://www.mydomain.com/wcfservice/MyService.svc"
       binding="basicHttpBinding" bindingConfiguration="BasicHttpBinding_IMyService"
       contract="MyWcfServiceReference.IMyService" name="BasicHttpBinding_IMyService" />
  </client>    
</system.serviceModel>