Sunday, December 2, 2012

WCF : A Simple REST Client using HttpClient

[Articles for WCF REST Services]
1) WCF : A simple WCF REST service example (1)
2) WCF : A Simple WCF REST (2) - Remove .svc in REST URL
3) WCF : A Simple WCF REST (3) - Use WCF REST template
4) Client : WCF : A Simple REST Client using HttpClient 

REST client can be written in many ways such as using AJAX, using .NET APIs, etc. This post shows a simple REST client using one of APIs - HttpClient. The HttpClient is a class in REST Starter Kit that creates a REST client.

The sample client below is a console application that utilizes Microsoft.Http.HttpClient. The sample in this post calls a web service that was created from the previouse post (WCF : A Simple REST service example). (Please note that .svc was removed in REST url for brevity by applying a ASP.NET routing as explained in this post, so let's assume that base address is http://localhost/SimpleRest)

(1) Create a new Console project in VS
(2) Add Reference on Microsoft.Http.dll and Microsoft.Http.Extensions.dll which are installed from REST Starter Kit.
(3) Add DataContract class called Customer. Please note that we set empty string for Namespace in DataContract attribute. The namespace should match the one in server-side DataContract.

using System;
using Microsoft.Http; // for WCF REST Starter Kit
using System.Xml.Linq; // for ReadAsXElement
using System.Runtime.Serialization; // for DataContract
using System.Collections.Generic; 
namespace RestKitClient
{
    class Program
    {
        //test example
        static void Main(string[] args)
        {
            GetAllCustomers();
            AddCustomer();
            GetSingleCustomer();
        }

        static void GetSingleCustomer()
        {
            using (HttpClient client = new HttpClient("http://localhost/SimpleRest/"))
            {
                HttpResponseMessage resp = client.Get("Customer/101");
                resp.EnsureStatusIsSuccessful();
                // Read XML
                string result = resp.Content.ReadAsXElement().ToString();
                Console.WriteLine(result);
            }
        }

        static void GetAllCustomers()
        {
            using (HttpClient client = new HttpClient("http://localhost/SimpleRest/"))
            {
                HttpResponseMessage resp = client.Get("Customers");
                resp.EnsureStatusIsSuccessful();
            
                List<Customer> customers = resp.Content.ReadAsDataContract<List<Customer>>();
                foreach (var c in customers)
                {
                    Console.WriteLine(c.ToString());
                }
            }
        }
        
        static void AddCustomer()
        {
            using (HttpClient client = new HttpClient("http://localhost/SimpleRest/"))
            {
                Customer c = new Customer
                {
                    Id = 101,
                    Name = "Lisa2",
                    Address = "New York"
                };
                var body = HttpContentExtensions.CreateDataContract<Customer>(c);

                HttpResponseMessage resp = client.Send(HttpMethod.POST, "Customer", body);                
                resp.EnsureStatusIsSuccessful();

                Console.WriteLine("Successfully posted");
            }
        }

        // Async BeginSend()
        static void GetAllCustomersAsync()
        {
            HttpClient client = new HttpClient("http://localhost/SimpleRest/");
            HttpRequestMessage req = new HttpRequestMessage("GET", "Customers");
            AsyncCallback callback = (asyncResult) => {
                HttpResponseMessage resp = client.EndSend(asyncResult);
                List<Customer> customers = resp.Content.ReadAsDataContract<List<Customer>>();
                foreach (var c in customers)
                {
                    Console.WriteLine(c.ToString());
                }
            };
            client.BeginSend(req, callback, null);  

            Console.WriteLine("Getting data...");
            Console.WriteLine("Do something in main thread...");
            System.Threading.Thread.Sleep(2000);         
        }
    }
    
    [DataContract(Namespace = "")]
    public class Customer
    {
        [DataMember]
        public int Id;
        [DataMember]
        public string Name;
        [DataMember]
        public string Address;

        public override string ToString()
        {
            return Id + "/" + Name + "/" + Address;
        }
    }
}

(4) Basically all requests such as GET, POST, PUT,DELETE can be sent to web service by using Send() method. But each request also can be called by a little simplified wrapper method. For example, for HTTP GET, HttpClient.Get() method is often used.
To get data from REST service, first create a HttpClient object with base address and then use Get method with relative URL and optional parameter(s). The below URL make a REST call to localhost/simplerest/customer/1.

HttpClient client = new HttpClient("http://localhost/SimpleRest/"))
HttpResponseMessage resp = client.Get("Customer/1");

(5) For HTTP POST, let's use HttpClient.Send() method. To post a new data to REST service, first create a HttpClient object with base address, and build a body content, and call POST with relative URL and a request body. For a request body, it can be string, byte array, stream or DataContract object. Below we used Customer DataContract object.

HttpClient client = new HttpClient("http://localhost/SimpleRest/"))
var body = HttpContentExtensions.CreateDataContract<Customer>(custObj);
HttpResponseMessage resp = client.Send(HttpMethod.POST, "Customer", body);    

HTTP DELETE, PUT requests are similar to POST. We can use Send() method with different HttpMethod enum value. We can also use Post(), Put(), Delete() methods in HttpClient class but they all eventually calls a Send() method under the hood.

(6) For asynchronous processing, BeginSend() or SendAsync() methods can be used instead of synchronous Send() method. GetAllCustomersAsync() method in the example above shows an example of BeginSend(). BeginSend() immediately returns without waiting response and run next statements. When the request is done, callback routine is run and EndSend() returns response from the REST call.

WCF : A Simple WCF REST (3) - Use WCF REST template

[Articles for WCF REST Services]
1) WCF : A simple WCF REST service example (1)
2) WCF : A Simple WCF REST (2) - Remove .svc in REST URL
3) WCF : A Simple WCF REST (3) - Use WCF REST template
4) Client : WCF : A Simple REST Client using HttpClient 

The prior posts WCF : A Simple WCF REST (1) and WCF : A Simple WCF REST (2) show how we can create RESTful web service by using WCF. The posts explains all the steps for creating REST service which is good for educational purpose, practically we'd better use WCF REST VS project template. VS 2008 and VS 2010 does not have WCF REST project template by default. They are provided in Online Template which we have to download.
So to get the template, go to Tools -> Extension Manager -> Online Gallary -> Search for WCF REST. You will see WCF REST Service Template 40 (for .NET 4) and WCF REST Service Template 35 (for .NET 3.5).


Download a template and then the project template will be shown in New Project -> Web -> WCF REST Service Application. Below is VS 2010 template.


Once a new project is created from the template, it has a Service1.cs (without IService.cs - the template directly used [ServiceContract] onto the Service1 class, which is legal) , already REST enabled Web.config,  and Global.asax that already has REST routing.
Here is a Service1 class that is generated from the template.
using System;
using System.Collections.Generic;
using System.ServiceModel;
using System.ServiceModel.Activation;
using System.ServiceModel.Web;

namespace WcfRestService2
{
    // Start the service and browse to http://<machine_name>:<port>/Service1/help to view the service's generated help page
    // NOTE: By default, a new instance of the service is created for each call; change the InstanceContextMode to Single if you want
    // a single instance of the service to process all calls. 
    [ServiceContract]
    [AspNetCompatibilityRequirements(RequirementsMode = AspNetCompatibilityRequirementsMode.Allowed)]
    [ServiceBehavior(InstanceContextMode = InstanceContextMode.PerCall)]
    // NOTE: If the service is renamed, remember to update the global.asax.cs file
    public class Service1
    {
        // TODO: Implement the collection resource that will contain the SampleItem instances

        [WebGet(UriTemplate = "")]
        public List<SampleItem> GetCollection()
        {
            // TODO: Replace the current implementation to return a collection of SampleItem instances
            return new List<SampleItem>() { new SampleItem() { Id = 1, StringValue = "Hello" } };
        }

        [WebInvoke(UriTemplate = "", Method = "POST")]
        public SampleItem Create(SampleItem instance)
        {
            // TODO: Add the new instance of SampleItem to the collection
            throw new NotImplementedException();
        }

        [WebGet(UriTemplate = "{id}")]
        public SampleItem Get(string id)
        {
            // TODO: Return the instance of SampleItem with the given id
            throw new NotImplementedException();
        }

        [WebInvoke(UriTemplate = "{id}", Method = "PUT")]
        public SampleItem Update(string id, SampleItem instance)
        {
            // TODO: Update the given instance of SampleItem in the collection
            throw new NotImplementedException();
        }

        [WebInvoke(UriTemplate = "{id}", Method = "DELETE")]
        public void Delete(string id)
        {
            // TODO: Remove the instance of SampleItem with the given id from the collection
            throw new NotImplementedException();
        }

    }
}
And Web.config is:
<?xml version="1.0"?>
<configuration>
  
  <system.web>
    <compilation debug="true" targetFramework="4.0" />
  </system.web>

  <system.webServer>
    <modules runAllManagedModulesForAllRequests="true">
      <add name="UrlRoutingModule" type="System.Web.Routing.UrlRoutingModule, System.Web, 
Version=4.0.0.0, Culture=neutral, PublicKeyToken=b03f5f7f11d50a3a" />
    </modules>
  </system.webServer>

  <system.serviceModel>
    <serviceHostingEnvironment aspNetCompatibilityEnabled="true"/>
    <standardEndpoints>
      <webHttpEndpoint>
        <!-- 
            Configure the WCF REST service base address via the global.asax.cs file and the default endpoint 
            via the attributes on the <standardEndpoint> element below
        -->
        <standardEndpoint name="" helpEnabled="true" automaticFormatSelectionEnabled="true"/>
      </webHttpEndpoint>
    </standardEndpoints>
  </system.serviceModel>

</configuration>

Global.asax:

using System;
using System.ServiceModel.Activation;
using System.Web;
using System.Web.Routing;

namespace WcfRestService2
{
    public class Global : HttpApplication
    {
        void Application_Start(object sender, EventArgs e)
        {
            RegisterRoutes();
        }

        private void RegisterRoutes()
        {
            // Edit the base address of Service1 by replacing 
            // the "Service1" string below
            RouteTable.Routes.Add(new ServiceRoute("Service1", 
               new WebServiceHostFactory(), typeof(Service1)));
        }
    }
}

Suppose we published this web service to localhost/app,  then we can test http://localhost/app/Service1 to call GetCollection method.

Online template by default sets helpEnabled to true in web.config. So http://localhost/app/Service1/help will show meta data information which is very convenient.

Saturday, December 1, 2012

WCF : A Simple WCF REST (2) - Remove .svc in REST URL

[Articles for WCF REST Services]
1) WCF : A simple WCF REST service example (1)
2) WCF : A Simple WCF REST (2) - Remove .svc in REST URL
3) WCF : A Simple WCF REST (3) - Use WCF REST template
4) Client : WCF : A Simple REST Client using HttpClient 

In previous post, we used a URL containing .svc endpoint like http://localhost/SimpleRest/SimpleRestService.svc/test

In order to remove .svc from REST URL, we can use ASP.NET routing in .NET 4.0 or above.
(1) Assume we use the same Simple REST WCF project as in previous post.
(2) In Web.config, add UrlRoutingModule module and UrlRoutingHandler handler which are required for ASP.NET routing.

  <system.webServer>
    <modules runAllManagedModulesForAllRequests="true">    
      <add name="UrlRoutingModule" type="System.Web.Routing.UrlRoutingModule,
            System.Web, Version=4.0.0.0, Culture=neutral, 
            PublicKeyToken=b03f5f7f11d50a3a" />
    </modules>
    <handlers>
      <add name="UrlRoutingHandler" preCondition="integratedMode" 
                verb="*" path="UrlRouting.axd"/>
    </handlers>
  </system.webServer>

(3) In Web.config, set [aspNetCompatibilityEnabled] attribute to true in WCF host environment.

<system.serviceModel>
  <serviceHostingEnvironment multipleSiteBindingsEnabled="true" 
      aspNetCompatibilityEnabled="true" />
</system.serviceModel>

(4) Add New Item - [Global Application Class]. This will add global.asax.
(5) Add Reference to [System.ServiceModel.Activation.dll] to use ServiceRoute class.
(6) In Global.asax.cs file, add a Routing entry for REST service. With this routing information, .svc can be omitted.

protected void Application_Start(object sender, EventArgs e)
{
   RouteTable.Routes.Add(new ServiceRoute("", new WebServiceHostFactory(), 
                  typeof(SimpleRestService)));
}

(7) Now we do not have to use .svc in REST URL. In order to test new URL, try http://localhost/SimpleRest/test

And here is an example of REST POST without .svc.


(8) By the way, SimpleRest is web application name, if we want to remove that as well, we can create a Site in IIS Manager and publish REST application onto the Site root.
  • In IIS Manager, rightclick on Sites and click [Add Web Site]
  • Specify any site name and local folder path for web service. You can choose port 80, but only one port can be assigned to one IIS worker process at a time. So you might need to change Default Web Site port to other number like 8888.
  • Ensure that the Site uses .NET 4.0 (or matching version) in [Application Pools] of IIS Manager. And change process [Identity] appropriately if needed.

  • In VS, Publsh REST web service to the Site root.
So now we can use more precise URL such as  http://localhost/test , http://localhost/Customer/1.

Friday, November 30, 2012

WCF : A simple WCF REST service example (1)

[Articles for WCF REST Services]
1) WCF : A simple WCF REST service example (1)
2) WCF : A Simple WCF REST (2) - Remove .svc in REST URL
3) WCF : A Simple WCF REST (3) - Use WCF REST template
4) Client : WCF : A Simple REST Client using HttpClient 

This post shows a very simple WCF REST Service example. Here are summarized steps.

(1) Run Visual Studio
(2) New Project - WCF - [WCF Service Application]
(3) Delete IService1.cs and Service1.svc
(4) Add New Item - [WCF Service] item. Name it SimpleRestService.svc.
(5) Write WCF RESTful interface in ISimpleRestService.cs.

using System.Runtime.Serialization;
using System.ServiceModel;
using System.ServiceModel.Web;

namespace SimpleWcfRESTService
{    
    [ServiceContract]
    public interface ISimpleRestService
    {
        [OperationContract]
        [WebGet(UriTemplate="Test")]
        string DoTest();

        [OperationContract]
        [WebGet(UriTemplate = "CustomerName/{id}")] // URI param is always string type
        string GetCustomerName(string id);

        [OperationContract]
        [WebGet(UriTemplate = "Customer/{id}", BodyStyle = WebMessageBodyStyle.Bare)]
        Customer GetCustomer(string id);

        [OperationContract]
        [WebInvoke(Method = "POST", UriTemplate = "Customer", 
             BodyStyle = WebMessageBodyStyle.Bare,
             RequestFormat = WebMessageFormat.Xml)]
             // Default request format is XML
             // Should set Content-Type: application/xml in req. header
        bool AddCustomer(Customer cust);
        
        [OperationContract]
        [WebInvoke(Method="PUT", UriTemplate="Customer/{id}", BodyStyle = WebMessageBodyStyle.Bare)]
        bool UpdateCustomer(string id, Customer cust);

        [OperationContract]
        [WebInvoke(Method = "DELETE", UriTemplate = "Customer/{id}")]
        bool DeleteCustomer(string id);
    }

    [DataContract(Namespace="")]
    public class Customer
    {
        [DataMember]
        public int Id;
        [DataMember]
        public string Name;
        [DataMember]
        public string Address;     
    }

}

(6) Write WCF REST service class that implements the interface.
namespace SimpleWcfRESTService
{
    public class SimpleRestService : ISimpleRestService
    {        
        public string DoTest()
        {
            return "Testing SimpleRestService...";
        }

        public string GetCustomerName(string id)
        {
            Customer c = DBProcessor.GetCustomer(id);
            return c.Name;
        }

        public Customer GetCustomer(string id)
        {
            return DBProcessor.GetCustomer(id);            
        }

        public bool AddCustomer(Customer cust)
        {
            return DBProcessor.AddCustomer(cust);
        }

        public bool UpdateCustomer(string id, Customer cust)
        {
            return DBProcessor.UpdateCustomer(id, cust);
        }

        public bool DeleteCustomer(string id)
        {
            return DBProcessor.DeleteCustomer(id);
        }
    }
}
For persist mechanism, the example uses a helper class for database processing. This persist mechanism is not the focus of the example, here is an example for simple db processing. Assume we have a DBCustomer table (has Id,Name,Address columns) in SQL and we created LINQ to SQL .dbml for the table. For testing, add a few sample data.

using System.Linq;
namespace SimpleWcfRESTService
{
    public class DBProcessor
    {
        static DataClasses1DataContext db = new DataClasses1DataContext();

        public static Customer GetCustomer(string id)
        {
            int cid = int.Parse(id);
            var dbCust = db.DBCustomers.SingleOrDefault(p => p.Id == cid);
            Customer cust = new Customer();
            if (dbCust != null)
            {
                cust.Id = dbCust.Id;
                cust.Name = dbCust.Name;
                cust.Address = dbCust.Address;
            }
            return cust;
        }

        public static bool AddCustomer(Customer cust)
        {
            try
            {
                DBCustomer dbCust = new DBCustomer
                {
                    Id = cust.Id,
                    Name = cust.Name,
                    Address = cust.Address
                };
                db.DBCustomers.InsertOnSubmit(dbCust);
                db.SubmitChanges();
            }
            catch
            {
                return false;
            }
            return true;
        }

        public static bool UpdateCustomer(string id, Customer cust)
        {
            try
            {
                int cid = int.Parse(id);
                var dbCust = db.DBCustomers.SingleOrDefault(p => p.Id == cid);
                dbCust.Name = cust.Name;
                dbCust.Address = cust.Address;  
                db.SubmitChanges();              
            }
            catch
            {
                return false;
            }
            return true;
        }


        public static bool DeleteCustomer(string id)
        {
            try
            {
                int cid = int.Parse(id);
                var dbCust = db.DBCustomers.SingleOrDefault(p => p.Id == cid);
                db.DBCustomers.DeleteOnSubmit(dbCust);
                db.SubmitChanges();
            }
            catch
            {
                return false;
            }
            return true;
        }
    }
}

(7) Update web.config - use webHttpBinding for REST service and add REST (webHttp) endpointBehavior.

<?xml version="1.0"?>
<configuration>

  <connectionStrings>
    <add name="TestDBConnectionString" connectionString="Data Source=.;Initial Catalog=TestDB;Integrated Security=True"
      providerName="System.Data.SqlClient" />
  </connectionStrings>
  
  <system.web>
    <compilation debug="true" targetFramework="4.0" />
  </system.web>
  <system.serviceModel>
    <services>
      <service name="SimpleWcfRESTService.SimpleRestService">
        <endpoint address="" binding="webHttpBinding" 
                  behaviorConfiguration="REST"
                  contract="SimpleWcfRESTService.ISimpleRestService">          
        </endpoint>
      </service>
    </services>
        
    <behaviors>
      <serviceBehaviors>
        <behavior>
          <!-- To avoid disclosing metadata information, set the value below to false and remove the metadata endpoint above before deployment -->
          <serviceMetadata httpGetEnabled="true"/>
          <!-- To receive exception details in faults for debugging purposes, set the value below to true.  Set to false before deployment to avoid disclosing exception information -->
          <serviceDebug includeExceptionDetailInFaults="false"/>
        </behavior>
      </serviceBehaviors>

      <!-- If REST behavoir is not specified, the following error occurs:
           The message with To 'http://localhost/SimpleRest/SimpleRestService.svc/test' cannot be processed at the receiver, 
           due to an AddressFilter mismatch at the EndpointDispatcher.  Check that the sender and receiver's EndpointAddresses agree.-->
      <endpointBehaviors>
        <behavior name="REST">
          <webHttp />
        </behavior>
      </endpointBehaviors>
    </behaviors>
    <serviceHostingEnvironment multipleSiteBindingsEnabled="true" />
  </system.serviceModel>
  
  <system.webServer>
    <modules runAllManagedModulesForAllRequests="true"/>
  </system.webServer>
  
</configuration>

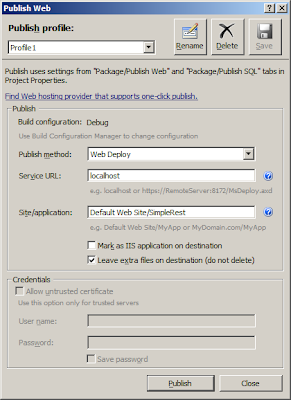
(8) IIS hosting - we can create a new Site for the REST service. But in this example, we add a new Web Application called SimpleRest under the Default Web Site (port 80). So the REST service can be accessed at http://localhost/SimpleRest/SimpleRestService.svc. (Run VS as an Administrator and publish REST service by using [Build] - [Publish Service] menu.)


(9) Once the REST service is published to Default Web Site, try a simple test URL in web browser.
http://localhost/SimpleRest/SimpleRestService.svc/test

(10) Now try to get data from database.
http://localhost/SimpleRest/SimpleRestService.svc/CustomerName/1
We got an error this time. When checking SQL Server error log, the failure is obvious. This is because by default [Default Web Site] application pool uses IIS APPPOOL\DefaultAppPool account but SQL does not include the account.

Login failed for user 'IIS APPPOOL\DefaultAppPool'. Reason: Token-based server access validation failed with an infrastructure error

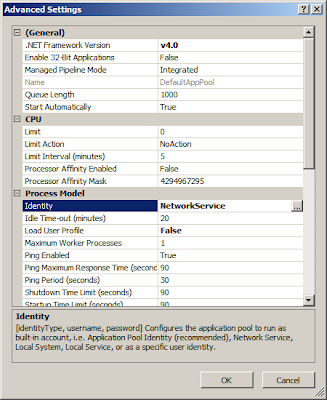
So either add this account (IIS APPPOOL\DefaultAppPool) to SQL logins or use different account for DefaultAppPool application pool. For test purpose, we can simply change IIS App Pool account to Network Service (How to: IIS manager - [Application Pools] - Click [DefaultAppPool] - Click [Advanced Settings] - Change [Identity]. Once it is changed and restart app pool, the URL above should give Name for customer id = 1.


(11) HTTP GET url can be tested in web browser but if we want to send some data to REST service via POST or PUT, we write REST clent program, AJAX in html or use utility tool such as Fiddler. To write REST client program, we could use various APIs such as HttpClient (REST Starter Kit), WCF WebChannelFactory, HttpWebRequest, WebClient. But here let's use Fiddler tool.


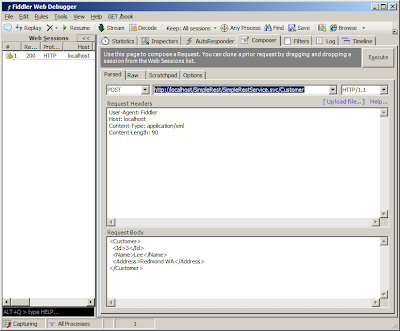
In order to test [Add Customer], in Fiddler, go to Composer and select POST method and type url http://localhost/SimpleRest/SimpleRestService.svc/Customer

In request header, type Content-Type: application/xml and type data below in Request Body. Click [Execute] then the data will be inserted into DB.
<Customer><Address>Bellevue WA</Address><Id>10</Id><Name>Tom</Name></Customer>

Please note that we add field data in Address/ID/Name order. If you specify the data in ID/Name/Address as specified in DataContract, Address will be null. This is because the default order of DataContract serialization/deserialization is alphabetical. (This order can be changed by specifying Order in DataMember attribute)

(12) HTTP PUT is similar to POST. So it is needed to fill in Request Body with data. HTTP DELETE is similar to GET since the method prototype only requires Id.
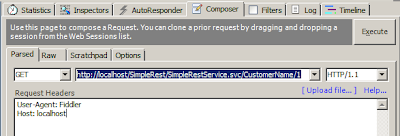
Here are some examples for HTTP GET/POST/PUT/DELETE requests in Fiddler.


(13) How to use JSON
Instead of XML as a request input or response output, we can use simpler JSON format. Default request/response message format is XML, so if we want to use JSON, we have to set RequestFormat and/or ResponseFormat to JSON. For example, we can define new URI [Customer/json] to use JSON input and output.
[OperationContract]
[WebInvoke(Method = "POST", UriTemplate = "Customer/json", 
     BodyStyle = WebMessageBodyStyle.Bare,
     RequestFormat = WebMessageFormat.Json, 
     ResponseFormat = WebMessageFormat.Json)]
Customer AddAndReturnCustomer(Customer cust);

And a simple implementation code is:
public Customer AddAndReturnCustomer(Customer cust) {
     bool success = DBProcessor.AddCustomer(cust);
     return cust;
}

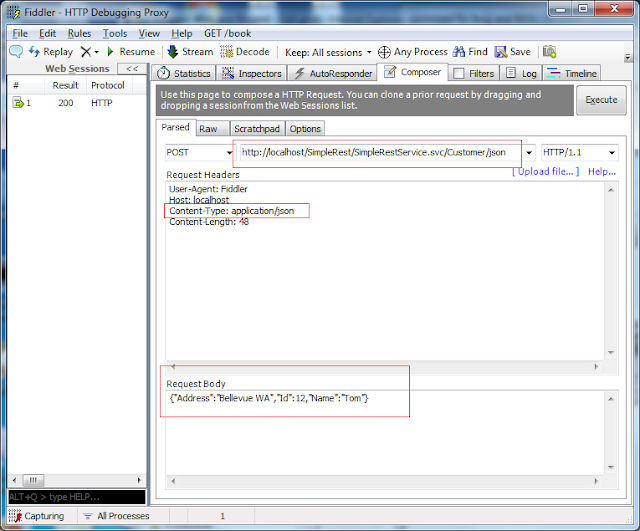
In order to use JSON from Fiddler, we set Content-Type to application/json and put json format input in request body as seen below. Response will be also JSON format as we set ResponseFormat to Json in WebInvoke attribute.


Tuesday, November 27, 2012

WCF : A simple WCF client example

This post shows a simple WCF client example which consumes a WCF service in previouse post. Most common way of using a WCF service is using proxy in client application. And the proxy is created either by using Visual Studio Add Service Reference or by using svcutil.exe tool.

(1) Run Visual Studio
(2) New Project - [Console Application]
(3) Rightclick on Project node in Solution Explorer and choose [Add Service Reference]
(4) Specify WCF service address in [Address] combobox and click [Go]. Services and Operations will be shown as below. Change Namespace at the bottom. This is the namespace for proxy.
 
 
(5) In project, a Service Reference and app.config will be added.

(6) To use a WCF service, we can use Proxy Client which is automatically generated from Add Service Reference and this is most common scenario. However, if we do not want to rely on proxy client, we can use ChannelFactory with having service interface only. Here we write a WCF client code in Program.cs.
 
 
using System;
using System.ServiceModel;
using SimpleWcfClient.MySimpleService;

namespace SimpleWcfClient
{
    class Program
    {
        static void Main(string[] args)
        {
            // 1. Using Proxy client
            SimpleServiceClient client = new SimpleServiceClient();
            string result = client.SayHello("Tom");
            Console.WriteLine(result);
            client.Close();

            // 2. Using ChannelFactory
            WSHttpBinding binding = new WSHttpBinding();
            EndpointAddress address = new EndpointAddress("http://localhost:8088/SimpleService.svc");
            ChannelFactory<ISimpleService> factory = new ChannelFactory<ISimpleService>(binding, address);
            ISimpleService iSimple = factory.CreateChannel();
            using (iSimple as IDisposable)
            {
                result = iSimple.SayHello("Jerry");
                Console.WriteLine(result);
            }
        }
    }
}

(7) App.config has endpoint information (not must have but proxy client above uses this config since no endpoint was passed in constructor). This assumes WCF service is hosted in IIS.
<?xml version="1.0" encoding="utf-8" ?>
<configuration>
    <system.serviceModel>
        <bindings>
            <wsHttpBinding>
                <binding name="WSHttpBinding_ISimpleService" />
            </wsHttpBinding>
        </bindings>
        <client>
            <endpoint address="http://localhost:8088/SimpleService.svc" binding="wsHttpBinding"
                bindingConfiguration="WSHttpBinding_ISimpleService" contract="MySimpleService.ISimpleService"
                name="WSHttpBinding_ISimpleService">
            </endpoint>
        </client>
    </system.serviceModel>
</configuration>

Monday, November 26, 2012

WCF : A simple self-hosting WCF service

There are three ways of hosting WCF service. Hosting in IIS, WAS, and self-hosting. The previous post showed a simple WCF service that is hosted in IIS. Another popular hosting mechanism is self-hosting.
We can self-host a WCF service in any application, for example, in console application, windows forms, or windows service. And the coding is relatively simple.

(1) Run Visual Studio
(2) New Project - [Console Application]
(3) Add New Item - [WCF Service] item. Name it SimpleService.svc.

(4) Write a WCF interface in ISimpleService.cs.

namespace SimpleWcfService
{    
    using System.Runtime.Serialization;
    using System.ServiceModel;

    [ServiceContract]
    public interface ISimpleService
    {
        [OperationContract]
        string SayHello(string name);
    }
}

(5) Write a WCF service class that implements the interface.
// SimpleService.svc.cs
namespace SimpleWcfService
{
    public class SimpleService : ISimpleService
    {
        public string SayHello(string name)
        {
            string v = "Hello " + name;
            return v;
        }
    }
}

(6) Write a self-hosting code in Program.cs
Basically we create System.ServiceModel.ServiceHost instance and call Open() method; and call Close() method once we are done.
using System;
using System.ServiceModel;

namespace SimpleWcfHost
{
    class Program
    {
        static void Main(string[] args)
        {
            ServiceHost host = new ServiceHost(typeof(SimpleService));            
            host.Open();

            Console.WriteLine("WCF Service Started. Press ENTER to stop.");
            Console.ReadLine();

            host.Close();
        }
    }
}

(7) Edit App.config file. As a base address, we specified http://localhost:8899/ as below.
<?xml version="1.0" encoding="utf-8" ?>
<configuration>
    <system.serviceModel>
        <behaviors>
            <serviceBehaviors>
                <behavior name="">
                    <serviceMetadata httpGetEnabled="true" />
                    <serviceDebug includeExceptionDetailInFaults="false" />
                </behavior>
            </serviceBehaviors>
        </behaviors>
        <services>
            <service name="SimpleWcfHost.SimpleService">
                <endpoint address="" binding="wsHttpBinding" contract="SimpleWcfHost.ISimpleService">
                    <identity>
                        <dns value="localhost" />
                    </identity>
                </endpoint>
                <endpoint address="mex" binding="mexHttpBinding" contract="IMetadataExchange" />
                <host>
                    <baseAddresses>
                        <add baseAddress="http://localhost:8899/" />
                    </baseAddresses>
                </host>
            </service>
        </services>
    </system.serviceModel>
</configuration>

(8) To check to see if the WCF service is running, open web browser and type http://localhost:8899/


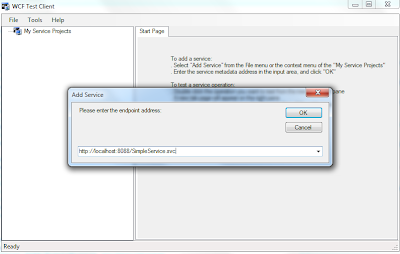
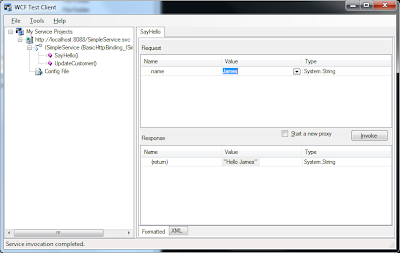
(9) To test WCF service from WCF client, first run self-hosting EXE application. And then you can run WcfTestClient.EXE client application. Specify service URL (http://localhost:8899/) and call a method by clicking [Invoke].


WCF : A simple WCF service exmaple

This post shows a very simple WCF example. Here are summarized steps.
 
(1) Run Visual Studio
(2) New Project - WCF - [WCF Service Application]
(3) Delete IService1.cs and Service1.svc
(4) Add New Item - [WCF Service] item. Name it SimpleService.svc.
 
(5) Write WCF interface in ISimpleService.cs as follows.
  • - WCF client only can see interface (or class) with ServiceContract attribute.
  • - WCF client only can use methods with OperationContract attribute. Properties, indexer, event cannot be used.
  • - WCF can only use primitive data type and DataContract type.
  • Regular CLR object reference cannot be used.
 
namespace SimpleWcfService
{    
    using System.Runtime.Serialization;
    using System.ServiceModel;

    [ServiceContract]
    public interface ISimpleService
    {
        [OperationContract]
        string SayHello(string name);

        [OperationContract]
        Customer UpdateCustomer(Customer customer);
    }

    [DataContract]
    public class Customer
    {
        [DataMember]
        public int ID { get; set; }

        [DataMember]
        public string Name { get; set; }
    }
}
 
(6) Write WCF service class that implements the interface.
// SimpleService.svc.cs
namespace SimpleWcfService
{
    public class SimpleService : ISimpleService
    {
        public string SayHello(string name)
        {
            string v = "Hello " + name;
            return v;
        }

        public Customer UpdateCustomer(Customer customer)
        {
            customer.Name += "#";
            return customer;
        }
    }
}
 
(7) Review SimpleService.svc file. Please note that Service name (SimpleWcfService.SimpleService) in this file. When wrong service name is specified here, service cannot be called. Developer often renames exisiting interface and class name but does not change this service name, which result in runtime error.(doubleclicking .svc in VS always often .svc.cs; so you have to use notepad to edit the file)
 
<%@ ServiceHost Language="C#" Debug="true" Service="SimpleWcfService.SimpleService" CodeBehind="SimpleService.svc.cs" %>
 
(8) web.config - by default httpGetEnabled is enabled which means you can use http get url to see meta data. Below is the default web.config.
<?xml version="1.0"?>
<configuration>
  <system.web>
    <compilation debug="true" targetFramework="4.0" />
  </system.web>
  <system.serviceModel>
    <behaviors>
      <serviceBehaviors>
        <behavior>          
          <serviceMetadata httpGetEnabled="true"/>          
          <serviceDebug includeExceptionDetailInFaults="false"/>
        </behavior>
      </serviceBehaviors>
    </behaviors>    
    <serviceHostingEnvironment multipleSiteBindingsEnabled="true" />
  </system.serviceModel>
  
  <system.webServer>
    <modules runAllManagedModulesForAllRequests="true"/>
  </system.webServer>
</configuration>
 
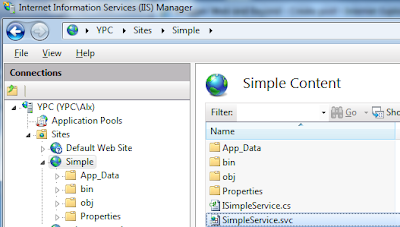
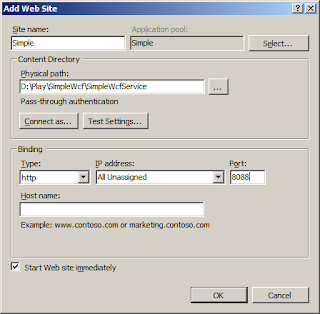
(9) WCF service can be hosted in IIS hosting, self-hosting (console application, windows application, service application, etc) or WAS. (8) To host WCF service in IIS, create a Site from IIS Manager. In this example, we add a new site called Simple with binding port 8088. So the service can be accessed by using http://localhost:8088/.


Click [Application Pools] and change .NET Framework version to v4.0 for the Simple website if it is not already set.
 
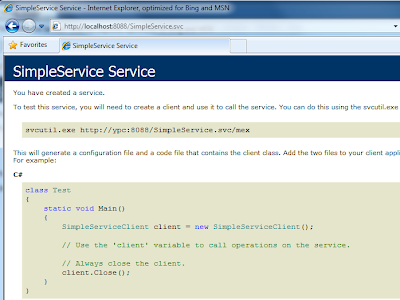
(10) To check to see if the WCF service is running, open web browser and type http://localhost:8088/SimpleService.svc
The following output will be shown when the WCF service is well hosted in IIS.


(11) Metadata : There are two ways to enable MetaData - Http Get URL and MEX endpoint. If serviceMetadata is specified under behavior node in web.config, meta data service is created.
 
A. If httpGetEnabled is set to true in serviceMetadata node, HTTP URL can be used to get WSDL meta data.
  <system.serviceModel>
    <services>
      <service name="SimpleWcfService.SimpleService" behaviorConfiguration="behavior1">
      </service>
    </services>            
    <behaviors>
      <serviceBehaviors>
        <behavior name="behavior1">
          <serviceMetadata httpGetEnabled="true"/>
        </behavior>
      </serviceBehaviors>
    </behaviors>
  </system.serviceModel>
 
How to get metadata from HTTP GET
In web browser, type http://localhost:8088/SimpleService.svc?wsdl
 
B. MEX endpoint can be added in web.config to setup MEX.
 
Note: It is important to specify endpoint address correctly. Specifying incorrect url such as http://localhost:8088/ here can throw an exception. (See more details)
 
  <system.serviceModel>
    <services>      
      <service name="SimpleWcfService.SimpleService" behaviorConfiguration="behavior1">
        <endpoint address="http://localhost:8088/SimpleService.svc" binding="basicHttpBinding"
 contract="SimpleWcfService.ISimpleService"></endpoint>
        <endpoint address="mex" binding="mexHttpBinding" contract="IMetadataExchange"></endpoint>
      </service>
    </services>
            
    <behaviors>
      <serviceBehaviors>
        <behavior name="behavior1">
          <serviceMetadata />
        </behavior>
      </serviceBehaviors>
    </behaviors>
  </system.serviceModel>
 
How to get metadata from MEX endpoint
 
C:\Temp>svcutil.exe http://localhost:8088/SimpleService.svc/mex
Microsoft (R) Service Model Metadata Tool
[Microsoft (R) Windows (R) Communication Foundation, Version 4.0.30319.1]
Copyright (c) Microsoft Corporation.  All rights reserved.

Attempting to download metadata from 'http://localhost:8088/SimpleService.svc/mex' using WS-Metadata Exchange or DISCO.
Generating files...
C:\Temp\SimpleService.cs
C:\Temp\output.config
 
(12) To test WCF service call from WCF client, run WcfTestClient.EXE. (C:\Program Files (x86)\Microsoft Visual Studio 10.0\Common7\IDE\WcfTestClient.exe)
Select File - [Add Service] and type WCF service URL. To call WCF service method, double a method from left pane and input any parameter and then click [Invoke] button. This makes a SOAP-based WCF service call and the response will be shown below pane.


(13) WCF trace log (.svclog) : WCF trace log is very useful when looking into any WCF problem you might run into. To enable WCF logging, add the following to web.config under Configuration node. The log file location is specified in initializeData attribute.
 
  <system.diagnostics>
    <sources>
      <source name="System.ServiceModel" switchValue="All" propagateActivity="true">
        <listeners>
          <add type="System.Diagnostics.DefaultTraceListener" name="Default">
            <filter type="" />
          </add>
          <add name="xml">
            <filter type="" />
          </add>
        </listeners>
      </source>
      <source name="System.ServiceModel.MessageLogging" switchValue="All">
        <listeners>
          <add type="System.Diagnostics.DefaultTraceListener" name="Default">
            <filter type="" />
          </add>
          <add name="xml">
            <filter type="" />
          </add>
        </listeners>
      </source>
      <source name="XMLService.dll" switchValue="Warning, ActivityTracing">
        <listeners>
          <add type="System.Diagnostics.DefaultTraceListener" name="Default">
            <filter type="" />
          </add>
          <add name="xml">
            <filter type="" />
          </add>
        </listeners>
      </source>
    </sources>
    <sharedListeners>
      <add initializeData="C:\Temp\mywcf.svclog"
        type="System.Diagnostics.XmlWriterTraceListener, System, Version=4.0.0.0,
 Culture=neutral, PublicKeyToken=b77a5c561934e089"
        name="xml" traceOutputOptions="LogicalOperationStack, DateTime, Timestamp, ProcessId, ThreadId, Callstack">
        <filter type="" />
      </add>
    </sharedListeners>
    <trace autoflush="true" />
  </system.diagnostics>

WCF : Failed to invoke the service. Possible causes: The service is offline or inaccessible; the client-side configuration does not match the proxy

There are many cases of getting this error when you call WCF service from your client.

Failed to invoke the service. Possible causes: The service is offline or inaccessible; the client-side configuration does not match the proxy; the existing proxy is invalid. Refer to the stack trace for more detail. You can try to recover by starting a new proxy, restoring to default configuration, or refreshing the service.


You can specify mismatched bindings between server config and client config. WCF trace log typcally can show more details. One of the cases I experienced was when I set invalid endpoint setting. When hosting WCF service in IIS, I incorrectly set an endpoint address. I was able to see WSDL by using http://localhost:8088/SimpleService.svc but when trying to call actual WCF service from WCFTestClient (VS tool), I got the excepton.
It turned out I specified http://localhost:8088/ in address attribute where I was supposed to specify http://localhost:8088/SimpleService.svc. (Note: we can use routing table to avoid specifying .svc file, but I did not use routing table for this case. Please see this post for this sample)
  <system.serviceModel>    
    <services>      
      <service name="SimpleWcfService.SimpleService" 
        <endpoint address="http://localhost:8088/" binding="wsHttpBinding"
                  contract="SimpleWcfService.ISimpleService"></endpoint>       
      </service>
    </services>
  </system.serviceModel>
By changing address attribute to .svc url, it all worked fine.

Thursday, November 15, 2012

WCF REST service on Windows 2008 R2

I developed a WCF REST service on my Windows 7 machine where worked fine. I happened to port my WCF REST application onto a branch new Windows 2008 R2 machine. So to migrate the WCF app to new Windows 2008 R2, I installed IIS Server and published a WCF REST service files as a Web Application on Default Web Site. Since this is REST service, I can use my web browser to invoke the web service. So I tried that, but of course, I was not able to invoke REST service... My test trial like http://localhost/wcf/service1.svc/test in a web browser gave me "HTTP Error 404.0 - Not Found" error.
So after wasting a few hours, I learned that I am missing two components in Windows 2008 R2.
  • Installing IIS server does not automatically install ASP.NET. Actually this does not only apply to Windows 2008. Other OSs like Windows 7 also requires to install ASP.NET after installing IIS.
    • How to setup ASP.NET
                    (64bit)
                    Run C:\Windows\Microsoft.NET\Framework64\v4.0.30319>aspnet_regiis.exe -i 

                    (32bit)
                    Run C:\Windows\Microsoft.NET\Framework\v4.0.30319>aspnet_regiis.exe -i
  • Add Application Server role in Windows 2008 R2. This requires only in Windows 2008 and above.
    • How to add Application Server
      • Open [Server Manager]
      • RightClick [Roles] and click [Add Roles]
      • Choose [Application Server] in the Wizard.
 After setting up both requirements, I was able to access REST service from web browser :-)

Tuesday, June 26, 2012

Simple GridView Example - Paging

This post shows a simple example of using GridView control in ASP.NET. Step-by-step procedures show  how to display data table in GridView control. If there are more than 20 rows, so-called paging will be enabled and page number will be shown at the bottom.

1. In ASP.NET web project, add a new Web Form. Let's say we have WebForm1.aspx.
2. In WebForm1.aspx, add GridView control from ToolBox into a DIV tag (or anyplace you want)


3. Once we have GridView control in .aspx, we can add data to the control in code behind.

protected void Page_Load(object sender, EventArgs e)
{
    if (!this.IsPostBack)
    {
        LoadData();
    }
}
private void LoadData()
{
    DataSet ds = MyData.GetDataSet("SELECT * FROM Emp");            
    GridView1.DataSource = ds;
    GridView1.DataBind();
}

Let's assume the MyData.GetDataSet() returns DataSet containing Emp table data (see below for this part).
To bind table data, (1) set DataSource to the dataset and (2) call DataBind() method of GridView control.

So the steps above are enough to display all table data to GridView control.
However, if the table has many rows, limiting rows per page - so called Paging - might be useful.
To allow paging,

4. Set [AllowPaging] to true and change [PageSize] to 20 from default 10. (You can change these values from Property Window). This means you display max 20 rows in one page and if there are more pages, page number will be given at the bottom.

<asp:GridView ID="GridView1" AllowPaging="True" PageSize="20" ...></asp:GridView>

5. Add event handler for [OnPageIndexChanging] event. In the event handler, the code set PageIndex property and rebind the data.

In. WebForm1.aspx :

 asp:GridView ID="GridView1" OnPageIndexChanging="GridView1_PageIndexChanging" ...

In. WebForm1.aspx.cs :  

protected void GridView1_PageIndexChanging(object sender, GridViewPageEventArgs e)
{
    GridView1.PageIndex = e.NewPageIndex;
    LoadData();
}
6. Optionally, to make it look better, add [AlternatingRowStyle-BackColor] and CellPadding. Alternating setting enables different background for every other row. CellPadding gives some spaces in each cell.

AlternatingRowStyle-BackColor="Aqua" HeaderStyle-BackColor="Silver" CellPadding="3"

So this is it.
Below is the data access class, just added here to complete the sample code.

class MyData
{
    public static DataSet GetDataSet(string sql)
    {
        DataSet ds = null;
        string strConn = "Data Source=.;Initial Catalog=MyDB;Integrated Security=SSPI";
        using (SqlConnection conn = new SqlConnection(strConn))
        {
            conn.Open();
            SqlCommand cmd = new SqlCommand(sql, conn);
            SqlDataAdapter adpt = new SqlDataAdapter(cmd);
            ds = new DataSet();
            adpt.Fill(ds);
        }
        return ds;
    }
}

Saturday, March 17, 2012

How to add video to webpage

Simple example of how to add video to your webpage?
Here are some simple examples about adding video to webpage. (environment : Windows - IE / IIS)

1. How to add .WMV video file to web page

Assuming clients already have Windows Media Player, the following HTML will play a wmv file in 400x400 size. If there is no plug-in installed, you will be asked to install appropriate plug-in. Please note that this test HTML has wildlife.wmv file under local IIS wwwroot folder.

<html>
<head>
<title>WMV Video</title>
</head>
<body>
   <object type="video/x-ms-wmv" width="400" height="400">
     <param name="filename" value ="http://localhost/Wildlife.wmv" />
   </object>
</body>
</html>
In object tag, you can add classid and codebase attribute to specify the plug-in and its download location.

2. How to add .MP4 video file to web page (without HTML5)

MP4 video file is played by QuickTime player. In HTML object tag, classid and codebase is specified to point out plug-in and its download location. The mp4 video filename is specified in param element.

<html>
<head>
<title>Video 1</title>
</head>
<body>
  <object width="420" height="360"
     classid="clsid:02BF25D5-8C17-4B23-BC80-D3488ABDDC6B"
     codebase="http://www.apple.com/qtactivex/qtplugin.cab">
   <param name="src" value="http://localhost/test.mp4" />  
  </object>
</body>
</html>

If you launch your Internet Explorer and type the HTML url, you might notice that mp4 video is not playing. This is because you need one more setting in IIS for mp4 video.
In IIS, you need to add mp4 MIME type if it's not already there. Goto IIS Manager -> IIS Server Properties -> Click MIME Types in IIS section.


In MIME Types list, rightclick and select Add. Then add .mp4 with video/mp4 MIME type.

Now, you will be able to play .mp4 video.
 
3. How to add .MP4 video file to web page (with HTML5)

HTML5 <video> tag resolves a lot of hassles about playing video in various browsers. In source element, one specified video type (video/mp4) and its source file location.

<html>
<head>
<title>Video MP4</title>
</head>
<body>
  <video id="Player" width="640" height="480" controls="controls">
     <source src="test.mp4" type="video/mp4" />
        Your browser does not support the video tag.
  </video>
</body>
</html>
If you use IE 8.0, the HTML above will not work since IE 8 does not support HTML5. (IE 9.0 will support HTML 5). The HTML above can be tested in Google Chrome which supports HTML5.